
Colorful Skittle Nails: 30 Easy Neon Ideas for Beginners Quick Answer Guide
Skittle nails are a fun manicure style where each finger is painted a different shade, creating a vibrant rainbow effect reminiscent of the famous candy. This technique stands out as one of the best easy nail designs for beginners because it relies on basic color placement rather than complex artwork. To master this trend, apply a solid coat of a distinct neon hue to each nail, using a milky white base to make the colors pop.
+---------------------------------------------------------------------------------------------+
                                 THE 6-1-1 SKITTLE RULE CHEAT SHEET
+--------------------------+-----------------------------------+------------------------------+
| 6 NEON SHADES            | 1 NEUTRAL REST NAIL               | 1 FINISH ACCENT
+--------------------------+-----------------------------------+------------------------------+
| Hot Pink (#FF1F8E)       | Milky White (#FFFDF7)             | High-Gloss Jelly Top Coat        |
| Tangerine Orange (#FF7A1A)| Balances intensity across fingers | OR                               |
| Sunshine Yellow (#FFE600)| Prevents color clash              | Velvet Matte Accent Nail         |
| Lime Green (#7CFF3AC)    | Acts as canvas for mini art       | Adds texture contrast            |
| Electric Blue (#1E6BFF)  | Keeps look chic, not messy        | Elevates basic polish            |
| Neon Purple (#A23BFF)    | Essential for beginner balance    | Easy visual upgrade              |
+--------------------------+-----------------------------------+------------------------------+
What Are Skittle Nails (and Why Beginners Love Them)
You are sitting at your desk scrolling through endless nail inspo right before your salon appointment, completely torn between six different bright colors. You love hot pink, but electric blue feels so fresh, and lime green is calling your name. Instead of choosing just one, skittle nails let you wear all of them at once without looking messy.
As Editorial Director at DailyNailIdea, I tested this exact trend at home during my busiest salon week, and it blew me away. Skittle nails are a technique where each finger gets a distinct shade. It is the ultimate solution for cute simple nails because you do not need steady hands or expensive fine liner brushes.
Beginners love this approach because the heavy lifting comes from your color palette, not intricate painting skills. You can skip the stress of freehanding complex patterns while still walking away with a set that looks custom and high-end.
If you can paint a basic solid coat of polish, you can master skittle nails. This approach works on natural nails, press-ons, and short acrylic nails alike. It delivers a high-impact, playful look in less than forty minutes.
The 6-Color Neon Palette Guide
Creating a balanced skittle set requires a thoughtful color palette so your hands look intentional rather than chaotic. Neon polishes can sometimes overwhelm the eye if the tone levels clash. The secret is pairing high-intensity brights with a soft, grounding neutral rest nail.
+----------------------------------------------------------------------------------------------+
|                               MASTER COLOR PALETTE SPECIFICATIONS
+-------------------+-----------------+-----------------------+--------------------------------+
 COLOR NAME        | HEX CODE        | PALETTE ROLE          | BEST ACCENT COMBINATION
+-------------------+-----------------+-----------------------+--------------------------------+
| Hot Pink          | #FF1F8E         | Primary Bright        | White Smiley Face Dot            |
| Tangerine Orange  | #FF7A1A         | Warm Transition       | Lime Green Wavy Line             |
| Sunshine Yellow   | #FFE600         | High-Visibility Pop   | Neon Purple Mini Heart           |
| Lime Green        | #7CFF3A         | Fresh Cool Contrast   | Hot Pink Center Dot              |
| Electric Blue     | #1E6BFF         | Deep Cool Anchor      | White Sorbet Base Accent         |
| Neon Purple       | #A23BFF         | Electric Accent       | Sunshine Yellow Micro Dot        |
| Milky White       | #FFFDF7         | Neutral Rest Base     | Multi-Color Skittle Art Canvas   |
+-------------------+-----------------+-----------------------+-------------------------------+
To execute our signature “6-1-1 Skittle Rule,” stock your kit with these seven foundational shades:
- Hot Pink (#FF1F8E): A vivid, punchy shade that leads the hand with high energy.
- Tangerine Orange (#FF7A1A): A warm, tropical shade that transitions pink smoothly into yellow.
- Sunshine Yellow (#FFE600): The ultimate bright pop that brightens the entire hand.
- Lime Green (#7CFF3A): A crisp, zesty shade that adds modern, edgy contrast.
- Electric Blue (#1E6BFF): A vivid, saturated tone that Grounds the warmer neon hues.
- Neon Purple (#A23BFF): A rich, electric violet that ties cool and warm tones together.
- Milky White (#FFFDF7): A soft, creamy off-white rest nail base that prevents visual overload.
To keep your set looking polished, use a glossy jelly top coat over four fingers, make one nail a velvet matte accent, and use your milky white shade on one finger as a palette cleanse.
Idea 1: The Classic Neon Rainbow Spectrum

The Classic Neon Rainbow Spectrum is the purest expression of skittle nails, making it the perfect starting point for any beginner. You paint each nail a solid, vibrant color straight from our core neon palette.
Start with hot pink on your thumb, tangerine orange on your index finger, sunshine yellow on your middle finger, lime green on your ring finger, and electric blue on your pinky. This smooth rainbow gradient follows the natural color spectrum across your hand, creating a balanced visual flow.
For the cleanest application, shape your nails into a crisp short square. Short square edges hold bright neon tones exceptionally well without feeling overly aggressive or lengthy.
Ask your nail tech for five solid neon coats over a smooth white primer layer to keep the tones rich. If you are doing this at home, apply two thin coats of polish, allowing two full minutes of drying time between layers.
Finish the entire set with a high-shine, plump gel top coat. This high-gloss layer locks in the color, prevents premature chipping, and gives your natural nails the polished look of a professional salon appointment.
Idea 2: Electric Sunset Skittle Gradient

The Electric Sunset Skittle Gradient focuses entirely on warm, fiery neon shades that mimic a vibrant evening sky. This warm palette creates a cohesive, radiant look that feels energetic and bright.
Paint your thumb neon purple, your index finger hot pink, your middle finger tangerine orange, your ring finger sunshine yellow, and leave your pinky coated in milky white. Placing the milky white shade on your smallest finger gives your hand an instant visual anchor.
This design suits short coffin acrylic nails because the tapered edges draw the eye inward, emphasizing the warm color transition. Ask your tech for a smooth squoval or coffin shape with ultra-flat edges.
If you are painting at home, ensure your cuticle prep is thorough. Bright warm tones tend to draw attention to messy cuticles, so push them back gently before painting.
[Affiliate opportunity: professional wooden cuticle pushers and nail prep wipes]
To give this warm set a chic twist, seal the neon purple and hot pink nails with a velvety matte top coat while keeping the orange, yellow, and white nails glossy.
Idea 3: High-Vis Lime & Electric Blue Cool Contrast

If you prefer cooler tones over warm pinks and oranges, the High-Vis Lime & Electric Blue Cool Contrast set is your match. This combination feels crisp, fresh, and slightly edgy.
Paint your thumb electric blue, your index finger lime green, your middle finger milky white, your ring finger electric blue, and your pinky lime green. Alternating these two bold colors creates an eye-catching pattern across your fingers.
The central milky white nail acts as a palette cleanser, keeping the lime green from clashing with the electric blue. This look works on both natural nails and short square acrylics.
When visiting the salon, ask for a high-pigment gel polish to ensure the lime green looks completely opaque. Neon greens can sometimes apply sheerly, so layer them carefully.
At home, clean up your sidewalls using an angled liner brush dipped in pure acetone before curing under a lamp. Keep the finish glossy to emphasize the crisp contrast between the blue and green.
Idea 4: Matte Neon Pink & Tangerine Sorbet
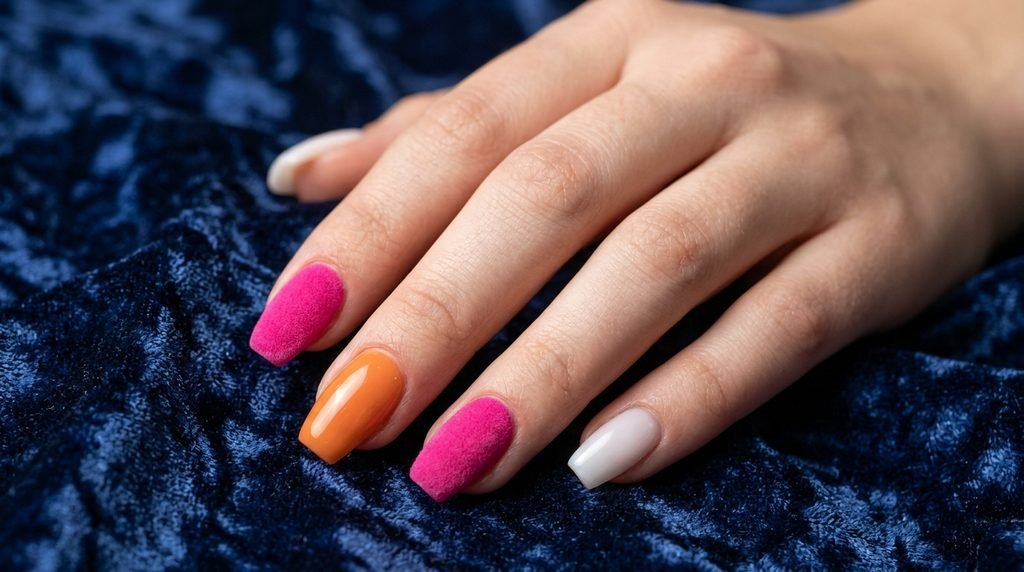
Combining textured finishes elevates a simple five-color polish job into an editorial-looking manicure. The Matte Neon Pink & Tangerine Sorbet set relies on tactile contrast to stand out.
Coat your thumb and ring finger in hot pink, your index finger and pinky in tangerine orange, and your middle finger in milky white. This balanced arrangement distributes the warm neon tones evenly across both hands.
Apply a velvet matte top coat strictly over the hot pink nails while leaving the orange and white nails coated in a thick, glass-like top coat. The contrast between matte and gloss makes the colors pop.
Short coffin nails provide the ideal canvas for this finish mix, as the tapered shape highlights the flat matte surface. Ask your salon tech for a soft velvet finish top coat rather than a chalky matte layer.
At home, remember that matte top coats dry much faster than glossy ones. Work quickly with light strokes to prevent dragging the polish beneath.
Idea 5: Sunshine & Purple Pops with Soft Milky Rest

Yellow and purple sit opposite each other on the color wheel, making them an ultra-vibrant pair for creative simple nail designs. The Sunshine & Purple Pops set utilizes this complementary contrast.
Paint your thumb sunshine yellow, your index finger neon purple, your middle finger milky white, your ring finger sunshine yellow, and your pinky neon purple. The middle white rest nail keeps the purple and yellow from feeling overwhelming.
This high-contrast style looks fantastic on short square nails with rounded corners. The rounded edges soften the bold, punchy look of the contrasting polishes.
When communicating with your nail technician, request a “milky jelly white” for the accent nail rather than a flat white out shade. A softer white gives the design a modern look.
If you are painting at home, apply your yellow polish in three very thin layers. Yellow formulas can be streaky, so patience during application is key to achieving total opacity.
Idea 6: The Full 6-Color Skittle Rotation
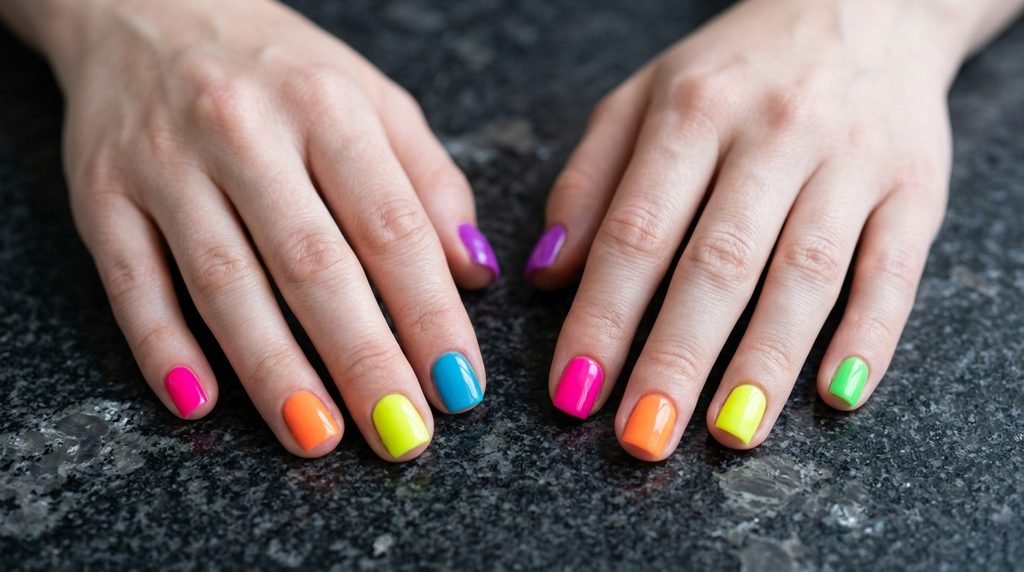
For those who want to wear every single shade in our neon palette, the Full 6-Color Skittle Rotation delivers maximum fun. This design uses all six brights plus our milky white base across both hands.
Left Hand:
- Thumb: Hot Pink (#FF1F8E)
- Index: Tangerine Orange (#FF7A1A)
- Middle: Sunshine Yellow (#FFE600)
- Ring: Lime Green (#7CFF3A)
- Pinky: Electric Blue (#1E6BFF)
Right Hand:
- Thumb: Neon Purple (#A23BFF)
- Index: Milky White (#FFFDF7)
- Middle: Hot Pink (#FF1F8E)
- Ring: Tangerine Orange (#FF7A1A)
- Pinky: Lime Green (#7CFF3A)
Because the colors vary between hands, the overall look feels dynamic, artistic, and cheerful. This option flatters natural short square nails, keeping the focus entirely on the color play.
Ask your tech to keep the polish thin at the cuticle line to avoid a bulky look on short nails. Seal all ten nails with a durable glossy top coat for maximum shine.
Idea 7: Jelly Neon Juice Box Skittle

Jelly polishes offer a translucent, glass-like finish that makes neon colors look bright and squishy, like candy. The Jelly Neon Juice Box Skittle set is ideal for warm weather or beach trips.
Use sheer jelly formulas of hot pink, lime green, electric blue, tangerine orange, and sunshine yellow across your five fingers. The sheer quality lets light pass through your nails, creating a glowing effect.
This style pairs beautifully with short coffin nails, as the translucent jelly edge catches the light along the tapered tip. Ask your salon for buildable neon jelly gel polishes.
If you are creating this look at home, you can make your own jelly polish by mixing three drops of your favorite neon shade into a clear top coat bottle.
[Affiliate opportunity: empty nail polish bottles and clear gel top coat mixers]
Apply two coats of your DIY jelly mix, then finish with a thick layer of quick-dry top coat for a glossy, plump look.
Idea 8: Monochrome Neon Purple & Pink Palette

If you love neon but want a more cohesive color scheme, the Monochrome Neon Purple & Pink Palette focuses on a single family of bright shades.
Paint your thumb hot pink, your index finger neon purple, your middle finger milky white, your ring finger hot pink, and your pinky a mix of equal parts hot pink and neon purple polish.
This creates a smooth, romantic gradient across your hand that still feels bright and energetic. Short square nails keep this look neat, chic, and totally wearable for everyday routines.
At the salon, ask your tech to layer a subtle pink shimmer over the white rest nail to tie the hand together.
At home, apply your pinks and purples over a ridge-filling base coat to ensure the surface is completely smooth before adding color.
Idea 9: Tropical Citrus Skittle Mix

The Tropical Citrus Skittle Mix brings together tangerine orange, sunshine yellow, and lime green for a sunny, refreshing look.
Paint your thumb tangerine orange, your index finger sunshine yellow, your middle finger lime green, your ring finger milky white, and your pinky tangerine orange.
This bright palette feels like a summer vacation and looks fantastic against sun-kissed skin. Short coffin acrylics complement this vibe by adding a touch of sleek sophistication to the cheerful colors.
Ask your technician for crisp square-off edges on your coffin shape to keep the vibrant citrus tones looking clean.
When doing this manicure at home, ensure your base coat is completely dry before applying yellow or lime green polish to prevent bubbling.
Idea 10: Electric Blue & Lime Sorbet Blend

Combining cool electric blue with zesty lime green creates a high-energy look that feels modern and fresh.
Paint your thumb and ring finger electric blue, your index finger and pinky lime green, and your middle finger milky white. This balanced layout keeps the bold colors organized.
This design suits short square nails with flat tops, giving it a minimalist aesthetic.
Ask your tech for a glossy finish on four fingers, with a single matte layer over the milky white rest nail for subtle texture contrast.
At home, use a small detail brush dipped in acetone to clean your cuticle lines after painting blue polish, as blue can stain dry skin if left uncleaned.
+----------------------------------------------------------------------------------------------+
                                    NAIL IDEA DESIGN & EXECUTIONS (IDEAS 1 - 10)
+------+--------------------------+---------------------+-------------------+------------------+
| IDEA | LOOK NAME                | DIFFICULTY (1-5)    | APPL. TIME        | RECOMMENDED SHAPE
+------+--------------------------+---------------------+-------------------+------------------+
| 1    | Classic Rainbow Spectrum | 1 (Very Easy)       | 30 Mins           | Short Square        | 5 Solid Neons + White|
| 2    | Electric Sunset Gradient | 1 (Very Easy)       | 35 Mins           | Short Coffin        | Velvet Matte Warm   |
| 3    | Lime & Blue Cool Contrast| 2 (Easy)            | 35 Mins           | Short Square        | High-Pigment Gel    |
| 4    | Matte Pink & Orange      | 2 (Easy)            | 40 Mins           | Short Coffin        | Mixed Gloss & Matte |
| 5    | Sunshine & Purple Pops   | 2 (Easy)            | 35 Mins           | Short Squoval       | Milky Jelly Rest    |
| 6    | Full 6-Color Rotation    | 1 (Very Easy)       | 40 Mins           | Short Square        | Thin Cuticle Layer  |
| 7    | Jelly Neon Juice Box     | 3 (Intermediate)    | 45 Mins           | Short Coffin        | Buildable Jelly Gel |
| 8    | Monochrome Purple & Pink | 1 (Very Easy)       | 30 Mins           | Short Square        | Pink Shimmer Rest   |
| 9    | Tropical Citrus Mix      | 2 (Easy)            | 35 Mins           | Short Coffin        | Crisp Coffin Edges  |
| 10   | Electric Blue & Lime     | 2 (Easy)            | 35 Mins           | Short Square        | Clean Sidewall Finish|
+------+--------------------------+---------------------+-------------------+------------------+
Idea 11: Neon Skittle with Tiny White Polka Dots

Adding simple polka dots is the easiest way to upgrade a standard skittle manicure without needing advanced art skills.
Paint your nails in the classic rotation: hot pink, tangerine orange, sunshine yellow, lime green, and electric blue. Once dry, use a wooden toothpick or a dotting tool dipped in milky white polish to place three small dots along the base of each nail.
+----------------------------------------------------------------------------------------------+
                                BEGINNER DOTTING TOOL TECHNIQUE
+----------------------------------------------------------------------------------------------+
| STEP 1: Pour a small bead of Milky White polish onto a non-porous surface (foil or tile).      |
| STEP 2: Dip the very tip of your dotting tool or toothpick lightly into the polish bead.        |
| STEP 3: Touch the tip vertically to the nail plate with light, even pressure.                   |
| STEP 4: Lift straight up to avoid smearing the circle into an oval.                             |
| STEP 5: Wipe the tool clean after every 3 dots to maintain uniform dot size.                    |
+----------------------------------------------------------------------------------------------+
These tiny white dots break up the solid color and add a charming detail that looks tricky but takes seconds to do.
This design flatters short square acrylic nails because the straight cuticle line provides a clean anchor for the dot placement.
Ask your nail tech for micro dots using a tiny ball-head dotting tool.
At home, let the dots dry for three minutes before applying top coat so you do not smear your circles into lines.
Idea 12: Accent Smileys on Milky White Rest

Smiley faces are cheerful, trendy, and surprisingly easy to paint using a dotting tool and thin detailer brush.
Paint four fingers in neon brights (hot pink, orange, green, blue) and paint your middle finger solid milky white.
On the white rest nail, use your sunshine yellow polish to create a small round circle in the center. Once dry, use black or deep purple polish to add two tiny dots for eyes and a curved line for the smile.
This accent nail serves as the focal point of your manicure, surrounded by vibrant solid colors.
Short coffin acrylics work great here because the wider base leaves plenty of room for the smiley graphic.
Ask your salon tech for a hand-painted retro smiley on the accent finger.
At home, keep your brush light when drawing the smile line to avoid thick, clumpy strokes.
Idea 13: Neon Hearts Skittle Accent
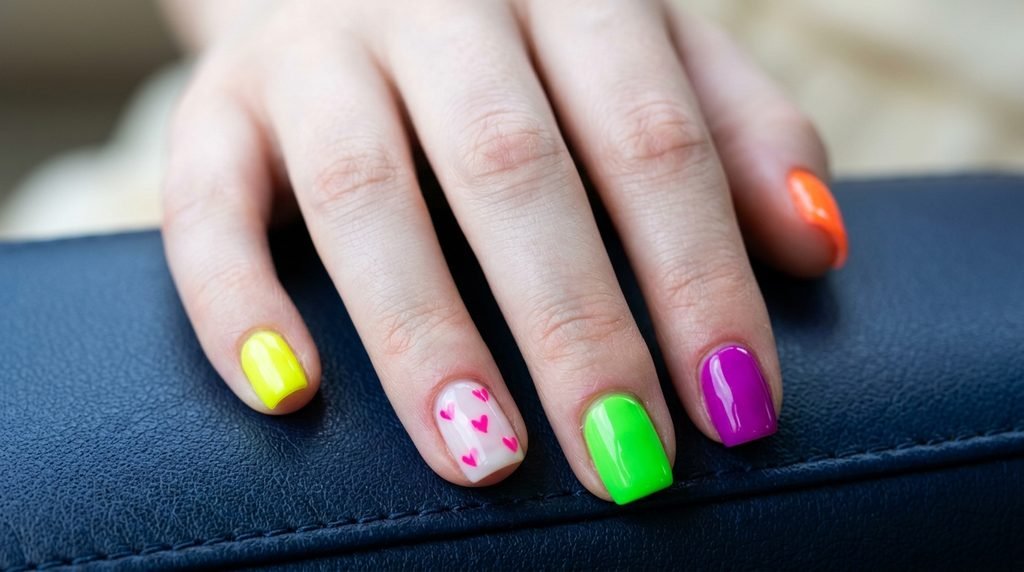
Miniature hearts add a sweet vibe to a bold neon manicure.
Paint four nails in bright neon shades and coat your ring finger with milky white polish.
Using a dotting tool dipped in hot pink polish, place two small dots side-by-side on the white nail. Use a toothpick to drag the bottom of both dots down into a central point, forming a tiny heart.
Repeat this process to add two or three tiny hearts across the white canvas.
This design suits short square nails, giving your manicure a cute look.
Request mini dot-method hearts from your technician for a clean shape.
At home, ensure your base coat is smooth so your tiny hearts lie flat without catching on texture.
Idea 14: Minimalist Wavy Sidewall Lines
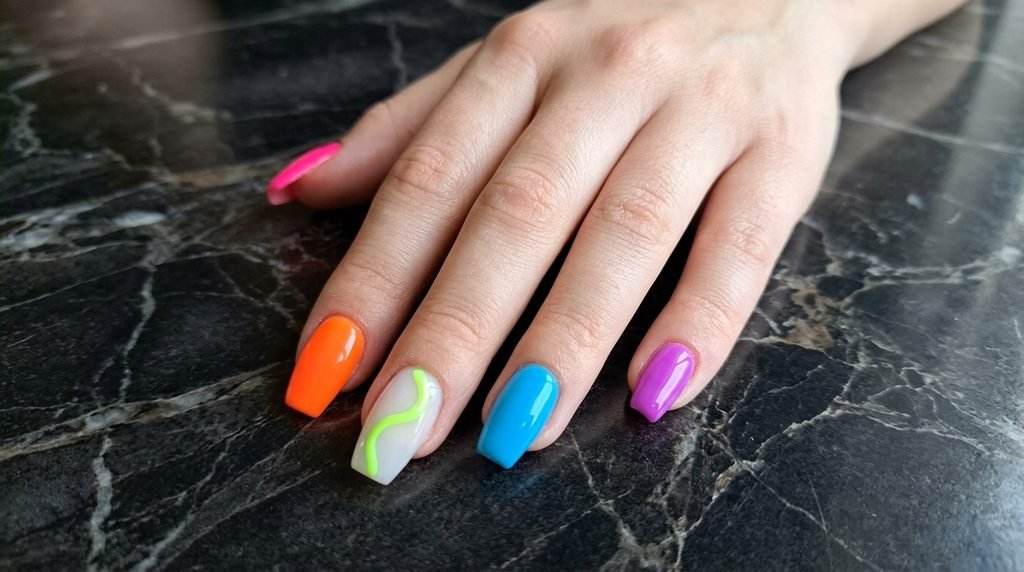
Wavy lines bring a dynamic, 70s-inspired feel to your skittle set without requiring straight lines.
Paint your thumb, index, ring, and pinky fingers in solid neon colors. On your middle finger, apply a milky white base coat.
Take a detail liner brush dipped in lime green polish and draw a single, gentle wavy line from the base of the nail up along the side edge.
The curving line adds movement to the set while keeping the art simple.
Short coffin nails enhance this design, as the tapered sidewalls complement the flowing wave.
Ask your nail technician for a single graphic wave line on your accent nail.
At home, rest your elbow on a flat table while painting to keep your hand steady during brush strokes.
Idea 15: Neon Skittle with Black Micro Dots

If you want an edgier twist on colorful nails, swap white dots for crisp black micro dots.
Paint your nails in your favorite neon combination (hot pink, lime green, electric blue, sunshine yellow, neon purple).
Dip the tiny tip of a toothpick into matte black polish and place one single dot near the cuticle on each finger.
The tiny black dot adds a modern, high-contrast detail that makes your neon polish look brighter.
Short square nails suit this minimalist style, emphasizing clean lines.
Ask your tech for a single micro dot placed right above the lunula on each nail plate.
At home, use high-pigment black polish so your dots look rich and opaque with a single touch.
Idea 16: Sorbet White Canvas with Multi-Color Dots

Instead of putting dots on neon polish, try putting multi-colored neon dots on a neutral white base.
Paint your thumb, index, ring, and pinky fingers in solid bright neons, and paint your middle finger in solid milky white.
Dip your dotting tool into each of the four neon shades and place one dot of each color onto the white middle finger in a small clustered pattern.
This accent nail ties all the colors of your set together on a single canvas.
Short squoval nails provide a versatile base for this cheerful design.
Ask your technician to cluster four neon dots near the center of the rest nail.
At home, wipe your dotting tool clean on a paper towel between each color to keep your neon shades clean.
Idea 17: Tiny Floating Hearts on Every Nail
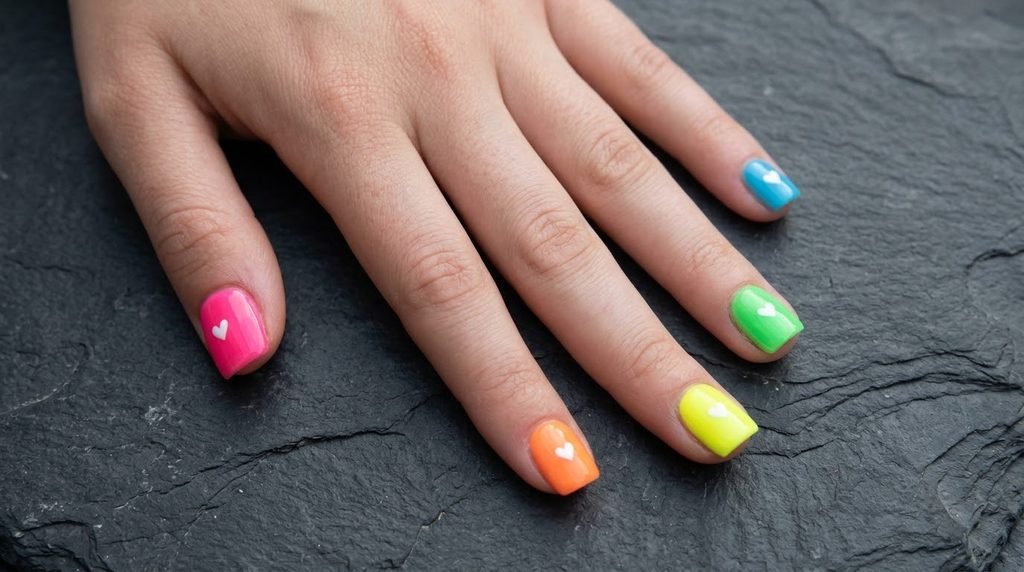
If one heart on an accent finger is not enough, add one tiny floating heart to every single nail in your set.
Paint your nails in your bright skittle color palette. Once the polish is set, use milky white polish to place one tiny heart near the center of each nail plate.
The white hearts contrast against the bright backgrounds, creating a sweet overall look.
Short square acrylic nails offer a flat surface that makes heart placement easy.
Ask your tech for micro stamped hearts or fine dot-method hearts on every nail.
At home, work with very little polish on your tool to keep the hearts small and delicate.
Idea 18: Retro Wavy Lines Across Two Accent Nails

Extend your line art across two fingers to create a continuous graphic design.
Paint your thumb, index, and pinky in solid neon shades, and paint your middle and ring fingers in milky white.
Draw a sweeping neon purple wavy line across the middle nail, continuing the curve onto the ring finger so the lines connect when your fingers are together.
This connected art looks custom and detailed while remaining manageable for beginners.
Short coffin nails provide the width needed for flowing wavy lines.
Ask your technician for connected accent wave art across your middle and ring nails.
At home, align your fingers before painting to mark the entry and exit points for your lines.
Idea 19: Dual-Dot Minimalist Skittle

The Dual-Dot Minimalist Skittle set uses two dots per nail to add structure to your bright manicure.
Paint each nail a different solid neon color. Using milky white polish, place two small dots aligned vertically down the middle of each nail plate.
This vertical line of dots visually elongates short nails while adding a modern detail.
Short square nails benefit from this design, as the straight vertical alignment balances the flat tips.
Ask your tech for vertically aligned center dots on every finger.
At home, use the natural center line of your nail as a guide to keep your dots straight.
Idea 20: Neon Smiley & Dot Party Set

Combine dots, smileys, and hearts into one accent nail for a fun, eclectic look.
Paint four fingers in solid neons, and paint your middle finger in milky white.
On the white finger, draw a small sunshine yellow smiley face in the center, a tiny pink heart above it, and two lime green dots below it.
This mix of simple shapes creates a custom look without requiring advanced painting skills.
Short square acrylic nails hold this detailed collection of micro art easily.
Ask your technician for a mini collage of simple shapes on a single white accent nail.
At home, let each shape dry completely before adding the next to keep colors from bleeding.
+----------------------------------------------------------------------------------------------+
                                    NAIL IDEA DESIGN & EXECUTIONS (IDEAS 11 - 20)
+------+--------------------------+---------------------+-------------------+-------------------
| IDEA | LOOK NAME                | DIFFICULTY (1-5)    | APPL. TIME        | RECOMMENDED SHAPE
+------+--------------------------+---------------------+-------------------+-------------------
| 11   | White Polka Dots         | 2 (Easy)            | 40 Mins           | Short Square        | Base Micro Dots     |
| 12   | Milky White Smileys      | 3 (Intermediate)    | 45 Mins           | Short Coffin        | Hand-Painted Smiley |
| 13   | Neon Hearts Accent       | 2 (Easy)            | 40 Mins           | Short Square        | Dot-Method Hearts   |
| 14   | Wavy Sidewall Lines      | 3 (Intermediate)    | 45 Mins           | Short Coffin        | Graphic Wave Line   |
| 15   | Black Micro Dots         | 2 (Easy)            | 35 Mins           | Short Square        | Lunula Micro Dot    |
| 16   | Multi-Color Dot Canvas   | 2 (Easy)            | 40 Mins           | Short Squoval       | Clustered Neon Dots |
| 17   | Floating Hearts Every Nail| 3 (Intermediate)   | 50 Mins           | Short Square        | Micro Stamped Hearts|
| 18   | Connected Wavy Lines     | 4 (Advanced)        | 55 Mins           | Short Coffin        | Connected Wave Art  |
| 19   | Dual-Dot Minimalist      | 2 (Easy)            | 35 Mins           | Short Square        | Vertical Center Dots|
| 20   | Mini Shape Collage Party | 4 (Advanced)        | 55 Mins           | Short Square        | Multi-Shape Accent  |
+------+--------------------------+---------------------+-------------------+-----------------+
Idea 21: Short Square Neon Skittle Acrylics

Short square acrylic nails are a practical choice for bright skittle designs. The straight, crisp tip creates a sharp edge that frames neon colors cleanly.
Apply your core neon shades (hot pink, orange, yellow, green, blue) over short square acrylic extensions.
+----------------------------------------------------------------------------------------------+
                                ACCENT FINISH STRATEGY COMPARISON
+------------------------+------------------------------------+--------------------------------+
| FEATURE                | GLOSSY JELLY TOP COAT              | VELVET MATTE TOP COAT             |
+------------------------+------------------------------------+--------------------------------+
| Visual Effect          | Plump, juicy, light-reflecting     | Smooth, flat, modern, tactile     |
| Best Paired With       | Electric Blue, Hot Pink            | Lime Green, Neon Purple           |
| Durability Rating      | High resistance to visible scuffs  | Shows oil; easily refreshed       |
| Application Tip        | Cap free edge generously           | Apply in 3 quick, light strokes   |
+------------------------+------------------------------------+--------------------------------+
The flat square edge provides a clean surface, keeping bright colors from looking messy. Short lengths are also great for typing and daily tasks.
Ask your technician for “short, slim-cut square acrylics with straight sidewalls and clean edges.”
At home, cap the front edge of your acrylic tip with top coat to prevent chipping along the straight edge.
Idea 22: Short Coffin Neon Skittle Acrylics
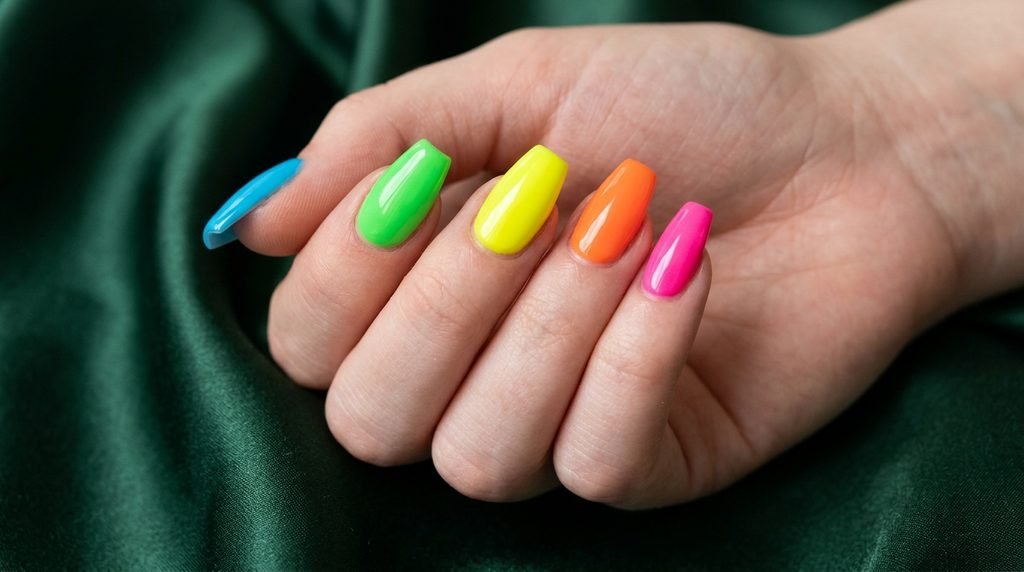
Short coffin acrylic nails offer a stylish alternative to standard square nails. The tapered sides narrow toward a flat, squared tip, elongating the appearance of your fingers.
Paint each coffin finger in a different bright neon shade, using hot pink and electric blue on your thumb and middle fingers to highlight the tapered shape.
The sleek shape adds a sophisticated edge to playful candy colors.
Ask your nail tech for “short coffin shape acrylic extensions with tapered sidewalls and a sharp tip.”
At home, use a fine nail file to clean up the flat coffin tip after applying top coat to keep the shape defined.
Idea 23: Matte Short Square Neon Skittle
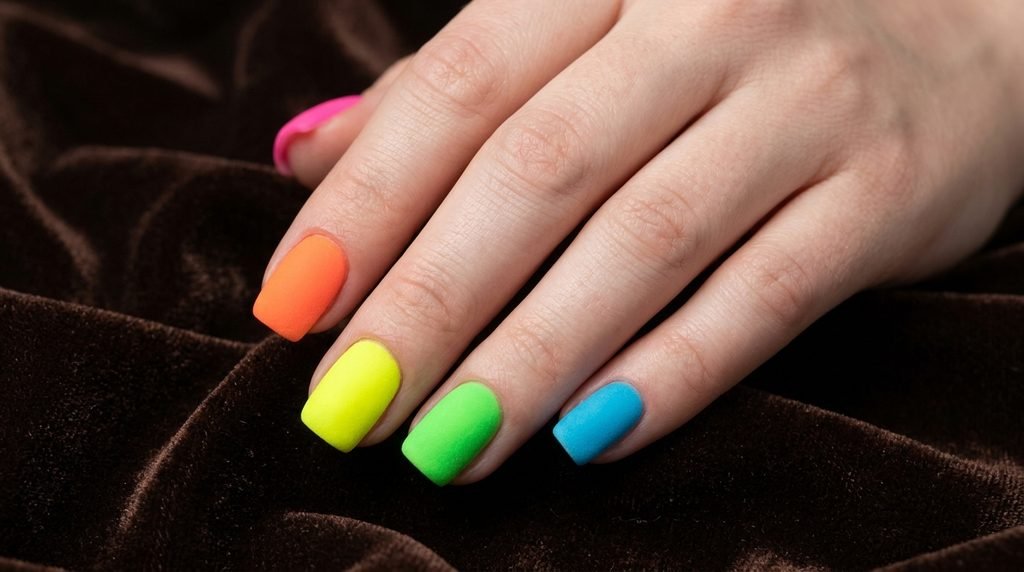
Transform bright acrylics into a modern set by using a completely matte top coat.
Apply your six neon shades over short square acrylics, then seal all ten nails with a velvet matte top coat.
Removing the high shine softens neon polishes, giving them a pastel-neon look that feels chic.
Ask your tech for a “velvet matte finish over solid acrylic neon coats.”
At home, wipe your dry matte top coat with an alcohol wipe to remove any lingering residue and reveal the flat finish.
Idea 24: High-Gloss Short Coffin Skittle

If you prefer a shiny finish, high-gloss short coffin acrylics reflect light like glass.
Paint short coffin acrylics with rich, high-pigment neon polishes, then seal with two layers of gel top coat.
The thick glossy finish gives neon colors extra depth, making them look rich and plump.
Ask your technician for a “double-cured high-shine gel top coat over short coffin acrylics.”
At home, apply cuticle oil daily to keep your cuticle area moisturized and maintain the fresh salon appearance.
Idea 25: Milky White Base Short Square Skittle
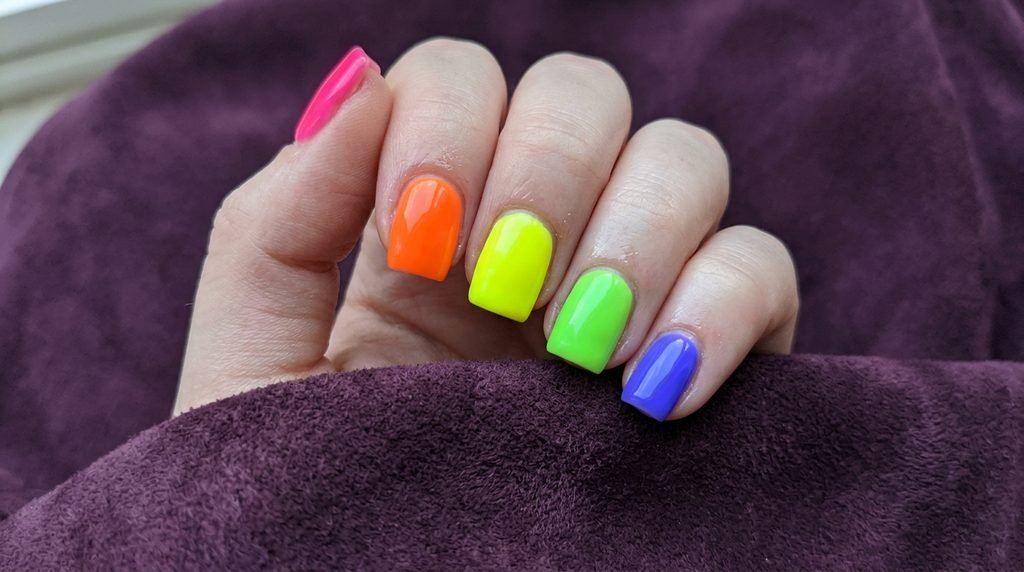
Using a milky white base coat under your neon polishes turns short square acrylics into a bright color show.
Apply one coat of milky white polish over your acrylic base, then add your neon colors on top.
+-------------------------------------------------------------------------------------------------+
|                                  THE WHITE UNDERCOAT ADVANTAGE                                  |
+-------------------------------------------------------------------------------------------------+
| WITOUT WHITE BASE: Neon polish appears translucent -> Requires 3-4 coats -> Looks thick/bumpy |
| WITH WHITE BASE:    1 coat Milky White + 2 coats Neon  -> 100% Opaque color -> Thin & natural   |
+-------------------------------------------------------------------------------------------------+
The white foundation prevents your natural nail bed from dampening the neon pigments, ensuring maximum brightness.
Ask your tech to apply a milky white base layer before adding your neon shades.
At home, ensure your white base coat is fully dry before applying bright polishes to avoid streaking.
Idea 26: Asymmetric Color Placement Short Coffin
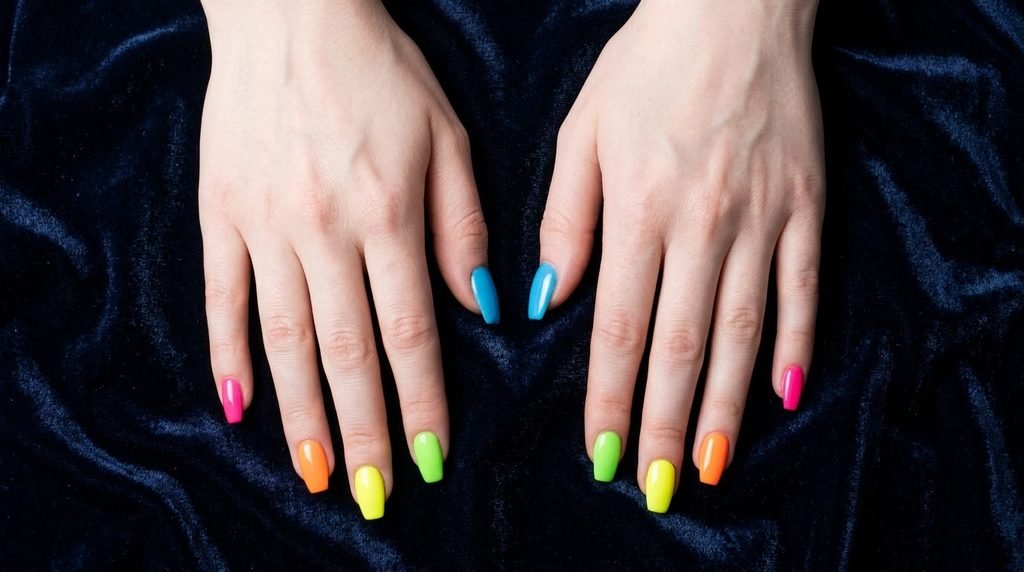
Asymmetric color placement creates a unique visual rhythm across your fingers.
Instead of matching color placements on both hands, offset them on your short coffin acrylics.
Left Hand: Pink (Thumb), Orange (Index), Yellow (Middle), Green (Ring), Blue (Pinky). Right Hand: Blue (Thumb), Green (Index), Yellow (Middle), Orange (Ring), Pink (Pinky).
This mirrored swap keeps your manicure visually interesting from every angle.
Ask your tech to mirror your neon color order across both hands.
At home, line up your polish bottles in front of you before starting to keep track of your color arrangement.
Idea 27: Neon Skittle with One Glitter Accent Nail

Add a subtle touch of sparkle to your bright set with a glitter accent finger.
Paint four acrylic nails in solid neon shades, and coat your ring finger in milky white topped with fine iridescent glitter.
The sparkle adds extra visual interest without detracting from the bright neon theme.
Ask your technician for a fine iridescent glitter overlay on a white accent acrylic.
At home, dab glitter polish onto the nail with a makeup sponge rather than brushing it on to achieve high sparkle density.
Idea 28: Short Square Skittle with French Tip Accent

Combine full-coverage skittle nails with a modern French tip accent finger.
Paint four fingers in solid bright neons. On your middle finger, apply a sheer nude base and paint a crisp neon tip using hot pink.
This classic nod balances full-coverage neon nails with clean negative space.
Ask your tech for a thin neon French edge on a nude accent finger.
At home, use smile-line guide stickers to get a clean curve on your French tip accent finger.
Idea 29: Neon Jelly Short Coffin Acrylics

Jelly neon acrylics combine translucent color with sleek shaping.
Use clear acrylic extensions overlayed with sheer neon jelly gel polishes on all five short coffin fingers.
The translucent quality lets light pass through the tip of your coffin shape, creating a glowing effect.
Ask your technician for translucent neon jelly gel over clear acrylic extensions.
At home, seal jelly polishes with a non-wipe top coat to preserve clarity without clouding the finish.
Idea 30: The Ultimate Mixed-Finish Skittle Set
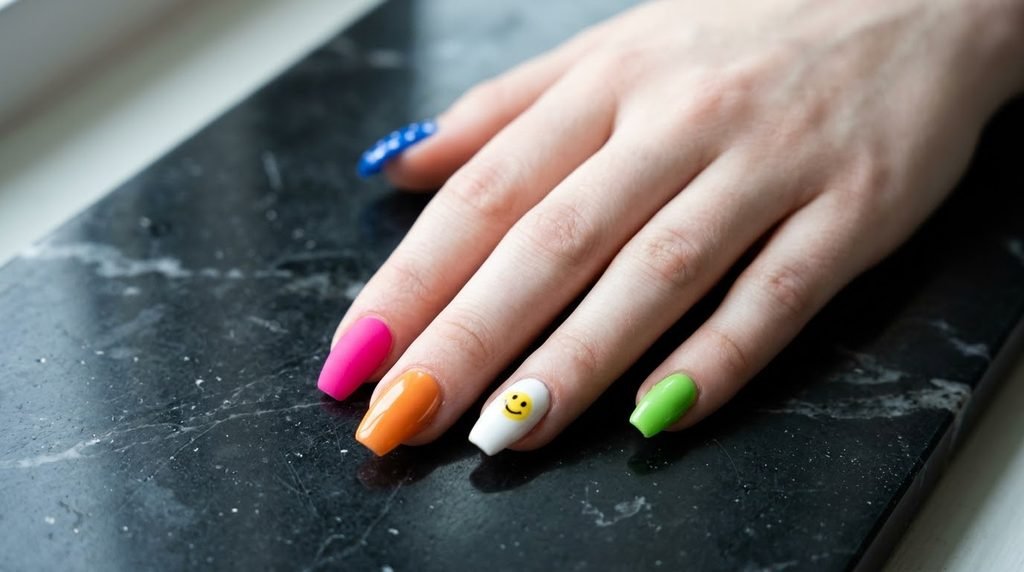
The Ultimate Mixed-Finish Skittle Set combines shapes, textures, and simple art into one stunning manicure.
Use short coffin acrylics with hot pink (matte), tangerine orange (glossy), milky white with a yellow smiley face (middle rest nail), lime green (glossy), and electric blue with white polka dots (pinky).
This combination showcases your personal style while remaining easy to execute.
Ask your tech for a multi-finish skittle set combining matte, gloss, and simple art accents.
At home, take your time applying each element step by step to keep the final set clean and polished.
+----------------------------------------------------------------------------------------------+
|                                    NAIL IDEA DESIGN & EXECUTIONS (IDEAS 21 - 30)
+------+--------------------------+---------------------+-------------------+------------------+
| IDEA | LOOK NAME                | DIFFICULTY (1-5)    | APPL. TIME        | RECOMMENDED SHAPE
+------+--------------------------+---------------------+-------------------+------------------+
| 21   | Short Square Basic       | 1 (Very Easy)       | 30 Mins           | Short Square        | Slim-Cut Square     |
| 22   | Short Coffin Basic       | 1 (Very Easy)       | 35 Mins           | Short Coffin        | Tapered Coffin      |
| 23   | Matte Short Square       | 2 (Easy)            | 35 Mins           | Short Square        | Velvet Matte Finish |
| 24   | High-Gloss Short Coffin  | 1 (Very Easy)       | 35 Mins           | Short Coffin        | Double High-Shine Gel|
| 25   | Milky White Undercoat    | 2 (Easy)            | 40 Mins           | Short Square        | White Base Coat     |
| 26   | Asymmetric Placement     | 2 (Easy)            | 40 Mins           | Short Coffin        | Mirrored Colors     |
| 27   | Glitter Accent           | 2 (Easy)            | 40 Mins           | Short Square        | Iridescent Glitter  |
| 28   | French Tip Accent        | 3 (Intermediate)    | 45 Mins           | Short Square        | Neon French Tip     |
| 29   | Translucent Jelly Coffin | 3 (Intermediate)    | 45 Mins           | Short Coffin        | Clear Jelly Gel     |
| 30   | Mixed-Finish Ultimate    | 4 (Advanced)        | 55 Mins           | Short Coffin        | Multi-Finish Collage|
+------+--------------------------+---------------------+-------------------+------------------+
How to Do Skittle Nails at Home (Step by Step)
Doing your own neon skittle nails at home is straightforward when you follow a structured routine. Skipping prep steps leads to premature peeling and uneven surfaces, especially with bright pigments.
Follow this step-by-step guide to get professional, salon-quality results on your kitchen table.
+----------------------------------------------------------------------------------------------+
                               STEP-BY-STEP AT-HOME APPLICATION
+---------------------------------------------------------------------------------------------+
| STEP 1: Cuticle Prep & Dehydration
| Push back cuticles gently; dehydrate nail plate using 99% isopropyl alcohol wipe.

| STEP 2: Protective Base Application
| Apply one thin coat of ridge-filling base coat; let dry 2 full minutes.

| STEP 3: Milky White Opacity Coat
| Apply 1 thin coat of Milky White (#FFFDF7) on all nails to anchor neon pigments.

| STEP 4: Strategic Color Placement
| Paint 2 thin coats of your chosen neon shade per finger, allowing 2 minutes between coats.

| STEP 5: Detail Art & Accents (Optional)
| Add micro dots, mini hearts, or smileys using a dotting tool dipped in contrasting polish.
| STEP 6: Edge-Sealing Top Coat                                                                   |
| Apply a plump top coat (glossy or matte), running the brush along the front edge to seal.
+---------------------------------------------------------------------------------------------+
Prep Your Nails Thoroughly
Start by gently pushing back your cuticles using a wooden pusher. Shape your nails into your preferred style—short square or short coffin work best for skittle looks.
Buff the surface lightly with a fine buffer block to remove shine and create tiny grooves for the polish to grip. Wipe away all dust using an alcohol wipe to ensure a dry, oil-free surface.
Apply Base Coat and White Primer
Apply a thin layer of protective base coat to shield natural nails from neon staining. Once dry, apply one thin layer of milky white polish across all fingers.
This white primer layer reflects light back through your neon polishes, making your colors look rich and even without requiring thick, slow-drying coats.
Paint Neon Colors with Care
Paint each finger with its designated neon color using long, steady strokes. Apply two thin coats rather than one thick layer.
Thin coats dry faster, resist bubbling, and wear much longer. Allow two full minutes of drying time between layers.
Seal the Edges with Top Coat
Finish your manicure with a high-quality top coat, making sure to cap the free edge of each nail. Capping the tip wraps polish over the front edge, protecting against daily wear and tear.
Allow your nails to dry completely before going about your day.
[Internal link opportunity: → long-lasting manicure tips]
Mistakes Beginners Make with Bright Polish (and How to Fix Them)
Neon polishes have unique formulas that can be tricky if you are used to dark creams or sheer nudes. Avoiding these common mistakes will save you time and frustration.
Skipping the Base Coat
Neon pigments are notorious for staining natural nail plates yellow or orange. Skipping a base coat allows these pigments to soak directly into your nail.
- The Fix: Always apply a dedicated protective base coat followed by a white primer layer before adding neon polish.
Painting Thick Layers
Because neon formulas can apply sheerly, beginners often apply thick coats to get fast coverage. This leads to air bubbles, uneven drying, and smudges.
- The Fix: Apply two to three paper-thin coats instead. Let each layer set for two minutes before adding the next.
Flooding the Cuticle Area
Applying too much polish near your skin causes flooding, creating a messy border that peels quickly once dry.
+---------------------------------------------------------------------------------------------+
                              CUTICLE FLOOD PREVENTION TECHNIQUE
+---------------------------------------------------------------------------------------------+
| INCORRECT: Placing brush directly against cuticle -> Polish pools into sidewalls -> Peels fast
| CORRECT:   Place brush 1mm away from cuticle -> Push gently toward skin -> Pull down smoothly
+----------------------------------------------------------------------------------------------+
- The Fix: Place your polish brush 1mm away from the cuticle line. Push the brush gently toward the skin to create a crisp curve, then pull down smoothly to the tip.
Frequently Asked Questions
What are skittle nails?
Skittle nails are a manicure style where each finger is painted a different bright color, similar to a multi-colored pack of Skittles candy. The design is popular because it requires no detailed art skills, relying on simple color placement to create a vibrant, playful look.
Are skittle nails easy for beginners?
Yes. Skittle nails are one of the easiest designs for beginners because each finger uses a single solid color. There is no need for fine brushes, stencils, or complex art techniques, making it easy to finish a complete set in thirty to forty minutes.
What colors go well together for skittle nails?
Hot pink, tangerine orange, sunshine yellow, lime green, electric blue, and neon purple create a balanced skittle palette. Combining shades of similar brightness keeps your set cohesive, while adding one milky white rest nail gives the eye a comfortable place to land.
How do I stop bright polish from looking streaky?
Apply two thin coats of polish instead of one thick layer, and always use a white base coat under neon shades. Neon polish is naturally translucent, so a white foundation makes colors appear richer, bolder, and more even across the nail plate.
Can I do skittle nails on acrylic?
Yes. Skittle nails look great on short square and short coffin acrylic extensions. You can apply gel or traditional polish over smooth acrylic surfaces and seal with a glossy top coat for long-lasting, vibrant color.
Do skittle nails look good on short nails?
Yes, short nails are ideal for skittle manicure styles. The compact shape keeps bright neon colors looking neat and chic rather than overly dramatic, making it a practical choice for everyday wear.
How do I make neon nail polish last longer?
To extend the life of your neon polish, cap the free edge of your nail plate with top coat during application. Avoid exposing your hands to hot water for the first two hours after painting, and reapply a thin top coat layer every three days to maintain shine and prevent chips.
Can I mix matte and glossy finishes on the same set?
Yes, mixing matte and glossy top coats adds a stylish touch to skittle nails. Try sealing four nails with a high-shine top coat while making one accent nail matte, creating a sleek texture contrast across your hand.
Colorful Skittle Nails Conclusion
Neon skittle nails are a fun, approachable way to experiment with bright colors without spending hours doing detailed nail art. By following our “6-1-1 Skittle Rule” and balancing high-visibility neons with a soft milky white rest nail, you get a custom set that looks intentional and stylish.
Whether you opt for simple solid coats on natural short square nails or add cute micro dots to short coffin acrylics, this vibrant look is sure to lift your mood every time you look down at your hands.
Save your favorite ideas from this post to show your nail tech at your next appointment, or grab your polish bottles to try this beginner-friendly look at home tonight. Which neon combination are you trying first?

Mia founded Daily Nail Idea after a decade in beauty editorial, tired of watching great nail art disappear into the scroll. She now leads the team’s editorial direction — deciding what’s worth featuring and what’s just noise — and still paints her own nails every Sunday night, no exceptions.